Building a Custom Zoho Integration?
Learning the API is only the first step. Building secure authentication, reliable workflows, and scalable integrations requires the right implementation strategy.
ZillTech’s Zoho Integration Services can help businesses connect Zoho with internal tools, automate workflows, and build integrations designed for long-term performance.
Planning a Zoho Project?
Avoid common API bottlenecks and integration mistakes. Get professional implementation support designed for your specific business requirements.
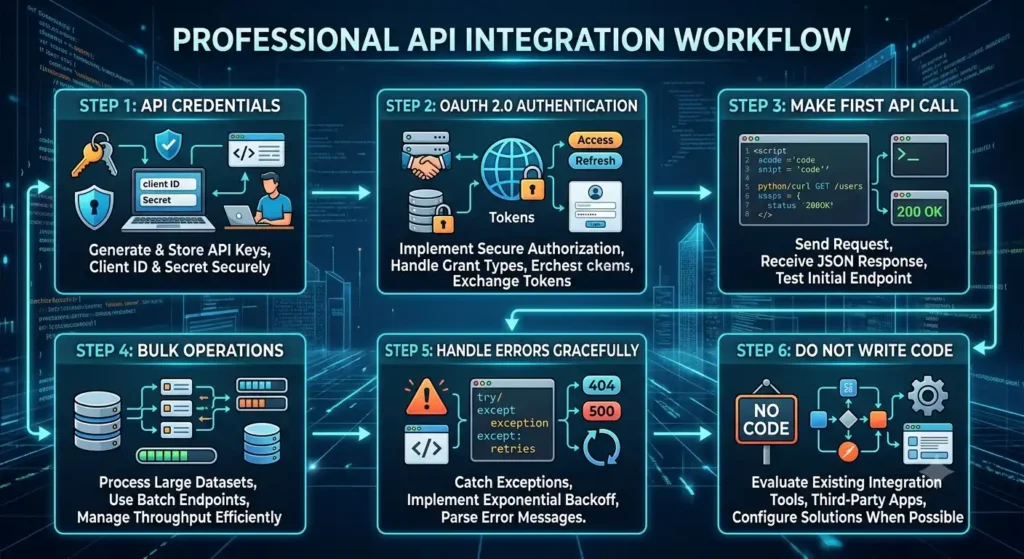
Step 1: Set Up Your API Credentials
Before making any API calls, register your application in the Zoho Developer Console at api-console.zoho.com.
Click Add Client and select Self Client. This is the correct option for server-to-server integrations where you are connecting your own internal systems. Complete the registration, and you will receive two values:
- Client ID: your application’s public identifier
- Client Secret: your application’s private key
Never commit your Client Secret to a public repository. Store it in environment variables or a secrets manager.
Step 2: Authenticate with OAuth 2.0
Zoho uses OAuth 2.0 for all API authentication rather than simple username and password combinations. OAuth 2.0 is an industry-standard security protocol that grants your application permission to access Zoho data without exposing login credentials directly.
Generate a Grant Token
In the Developer Console, select the Zoho modules you need access to and set the appropriate permission scopes. This generates a short-lived grant token.
Exchange for Access and Refresh Tokens
Use your grant token to request both an access token and a refresh token. You will receive:
- Access token: valid for one hour, used in all API requests
- Refresh token: is long-lived, used to generate new access tokens automatically
Note that refresh tokens can also expire or be revoked, so your code should handle that scenario as well.
Auto-Refresh Your Access Token
Since access tokens expire after one hour, build a refresh mechanism into your integration from the start. When the access token expires, your script should automatically request a new one using the refresh token. This prevents your integration from breaking mid-operation and saves significant debugging time later.
Step 3: Make Your First API Call
With a valid access token, you are ready to query Zoho. The base URL for the Zoho CRM API v2 is:
https://www.zohoapis.com/crm/v2/{module}
To fetch your leads, perform a GET request and pass the access token in your request headers:
GET https://www.zohoapis.com/crm/v2/Leads
Authorization: Zoho-oauthtoken YOUR_ACCESS_TOKEN
A successful response returns a JSON array of records.
A note on field API names:
Field names in the Zoho UI do not always match their API equivalents. For example, the field labelled “Last Name” in the interface is called Last_Name in the API. Always verify API field names before mapping data. You can find them in your Zoho CRM under Setup > Developer Space > APIs.
Zoho also provides an interactive API endpoint tester in their developer documentation, where you can paste your token and test calls directly in the browser—highly recommended before building your full integration.
Understanding Request Efficiencies
API request weight (lower value is more efficient for daily rate quotas)
100 Requests API Cost
1 Request API Cost
Need More Than a Basic API Connection?
Fetching records is easy. Building integrations that manage authentication, retries, monitoring, API limits, and long-term maintenance is where complexity increases.
ZillTech’s integration services can help build scalable Zoho integrations for operational workflows and custom business requirements.
Step 4: Work with Bulk Operations
If you are processing thousands of records, making individual API calls for each one is inefficient and will quickly exhaust your daily limits. Zoho’s bulk APIs let you include up to 100 records in a single insert call and up to 500 records in a single bulk tagging call. To understand how scaling works inside Zoho’s ecosystem, consider reading our comprehensive guide on business process automation with Zoho.
Use bulk operations wherever possible to stay within your plan’s daily API limits. For exact limits per plan, refer to Zoho’s official API limits documentation, as they vary by licence type.
Step 5: Handle Errors Gracefully
Good integrations anticipate failures. Here are the most common errors, what they represent, and how to handle them:
| HTTP Status Code | Common Cause | Recommended Remediation Strategy |
|---|---|---|
| HTTP 400 Bad Request | Mismatched field API names or malformed JSON payload. | Verify API field names inside Zoho’s Developer Space; check payload format. |
| HTTP 401 Unauthorized | Expired or revoked access token. | Trigger automated renewal workflow using your long-lived refresh token. |
| HTTP 429 Too Many Requests | API concurrency rate limit has been exceeded. | Implement an exponential backoff pause strategy before retrying. |
HTTP 429 Too Many Requests: This means you have hit the rate limit. Do not retry immediately, as that makes the problem worse. Implement a backoff strategy: pause for a short interval and retry. If it fails again, wait longer before trying once more.
HTTP 401 Unauthorized: This is almost always token-related. When you encounter a 401, the first step in your logic should be to refresh the access token before retrying the request.
HTTP 400 Bad Request: Check your field API names and request structure. A mismatched field name or malformed JSON body is usually the cause.
Step 6: Know When Not to Write Code
Before building a custom integration from scratch, consider whether Zoho’s built-in tools can solve the problem faster. When determining whether to write custom scripts or utilize existing automation configurations, businesses often refer to our Zoho CRM implementation guide to align their technical capabilities.
Zoho Flow is a visual automation builder, Zoho’s native equivalent of Zapier. It supports hundreds of triggers and actions across Zoho apps and third-party tools with no coding required. For the majority of standard business automations, Flow is the right starting point and will save you significant development time.
Deluge is Zoho’s own scripting language, available inside CRM, Desk, Creator, and other Zoho apps. It is ideal for lightweight automations such as sending a webhook to Slack when a deal stage changes, calling an external API and writing the response back to a CRM field, or formatting and routing data between Zoho modules. If you want to develop tailored software functions dynamically on low-code frameworks, check out how you can build custom business apps with Zoho Creator.
Zoho Catalyst is Zoho’s serverless computing platform. When you need a persistent backend, for example, a middleware function that transforms data between two systems, Catalyst handles the infrastructure so you do not have to manage your own servers. It works particularly well in combination with Deluge for more complex integrations.
Staying Current with Zoho’s API
Zoho’s API is actively developed and updated. To avoid broken integrations, keep the following in mind:
- Use stable endpoints only: Alpha and beta endpoints can be changed or removed without notice. Avoid building production integrations on endpoints that are not marked as stable.
- Monitor the changelog: Zoho publishes updates to its API documentation regularly. Check it before deploying changes.
- Test in a sandbox first: Always validate your integration in a test environment before pushing to production.
- Bookmark the official docs: The Zoho CRM Developer Documentation at zoho.com/crm/developer/docs is detailed, well-maintained, and includes an interactive API explorer that is genuinely useful.
Final Thoughts
Zoho APIs unlock capabilities beyond native integrations. Whether you are extending CRM functionality, connecting internal systems, or automating operations, a well-designed integration reduces maintenance and supports growth.
Need Professional Developers to Build Your API Solution?
ZillTech specializes in custom integrations, OAuth flow configurations, and complex multi-platform data synchronizations.
Explore how ZillTech’s integration services can help turn API documentation into production-ready business solutions.